The Most Significant 3D Printer I’ll Ever Build
This year, 2023, we welcomed RepRap Festivals back to the home of RepRap with the Sanjay Mortimer RepRap Festival (SMRRF) held in Oxford, England in the first weekend of December. This charity event not only brought together the 3D printing community to share their work and show what they’ve been working on, like all RepRap Festivals, but also raised funds for the Sanjay Mortimer Foundation, a non-profit organisation whose objective is to to find and assist those with neurodivergent minds to realise their potential through the field of engineering.
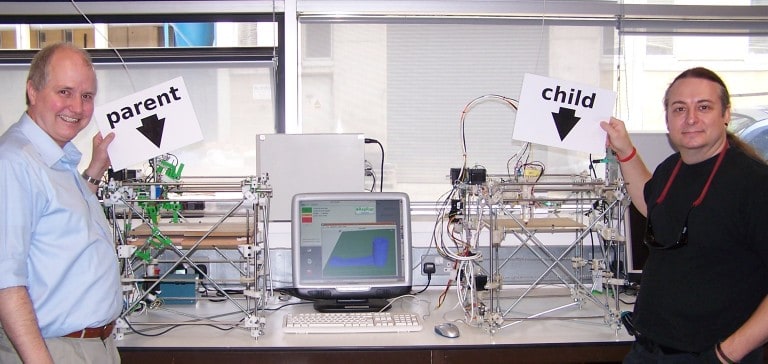
For those that don’t know, RepRap stands for Self-Replicating Rapid Prototyping Machine, a concept brought to fruition by Adrian Bowyer (MBE) and Ed Sells, a research student, around 2007. The concept was to develop a machine capable of manufacturing a significant proportion of its own parts and therefore, with the addition of simple off-the-shelf parts from a hardware store, able to self replicate.

Source: 3Dprintingindustry.com and RepRap
The first machine of its type was known as Darwin, presumably named after the English naturalist, geologist and biologist, Charles Darwin whom is widely known for his contributions to evolutionary biology, an analogue for the evolution in machines that additive manufacturing could bring.
The RepRap project was incredibly significant, not only because it could reduce the cost of producing an additive manufacturing machine, but because the plan from the start was to give away all the plans for free. They say “nothing in life is free”, but RepRap really is. All the design files, bill of materials and instructions are just there online, available to download without any need for sign up, subscription or anything. This was a stark change in culture for the industry since, up to this point, the additive manufacturing space had been dominated by large companies selling incredibly expensive machines, with all their intellectual property protected by patents.
Source: RepRapltd.com
The idea of releasing all the information about a project is known as Open Source. Open refers to the accessibility of the data, it really is an open door policy where anyone with an internet connection can download it. While Source refers to the nature of the data being shared, the source file being the one used in development to create the final product as opposed to any intermediary format. The sharing of source data means no reverse engineering is required to make updates, changes, improvements or to manufacture.
It was this openness of the project which, in the early days of RepRap especially, allowed for the rapid rate of development in technologies, methods and entire machines, which in theory, once publicly released, could not be patented since the technology would then exist in the public domain. Of course that does require the patent office to find and understand the existing works, but we’ll leave discussion of the patent system for another day.
The specific licence used for the Darwin machine is GNU General Public License. According to Wikipedia, “The GNU General Public License (GNU GPL or simply GPL) is a series of widely used free software licences or copyleft that guarantee end users the four freedoms to run, study, share, and modify the software.” The application to software rather than hardware didn’t hinder anyone’s understanding of the licence in the early years since those working on the project were of a similar understanding and without large companies operating in the space there was little commercial competition.
I don’t know if this was part of the original intention, but as well as increasing the accessibility of additive manufacturing through design and open source, the project also enhanced the decentralisation of manufacturing. During the Covid pandemic we saw how powerful a tool this can be as thousands of independent makers, hobbyists and DIYers, manufactured PPE for their local healthcare communities. These small operations were able to respond almost immediately to the demand whereas traditional manufacturing methods have long lead times and take months or years to catch up. These moments were not only a testament to the additive manufacturing technology, but also the 3D printing community; always ready and willing to help out. A community focused on giving, rather than taking.
It’s this RepRap community that Sanjay found himself a part of when building a small Huxley printer. As I’m sure many other 3D printing makers will relate to, Sanjay seems to have become somewhat obsessed with 3D printing from the outset and left his job as a teacher to start E3D-Online where, alongside the other founders (Josh and Dave?) they would start the development of hot ends and extruders which really took the early days of RepRap to an entirely new level. A decision which I think many of us are extremely thankful for.
Sanjay’s passing on the 27th November 2021 had a profound impact on the 3D printing community. In the words of Teula Bradshaw, CEO of the Sanjay Mortimer Foundation, “…Sanjay was just 32 years old, and in his short life he attained legendary status. You only needed to meet Sanjay once for him to have a profound impact on you – indeed, he even achieved that effect on some without ever having met them at all.” It’s with this perspective that we all recognise the kindness, fun, interest, excitement and dedication that Sanjay brought to 3D printing and should therefore come as no surprise the lasting effect his passing had, and will continue to have, on this community.
Sanjay was just 32 years old, and in his short life he attained legendary status. You only needed to meet Sanjay once for him to have a profound impact on you – indeed, he even achieved that effect on some without ever having met them at all.
Teula Bradshaw, CEO of the Sanjay Mortimer Foundation
It’s through this difficulty and tough reflection though, that sometimes we find inspiration and motivation to change or improve. Teula Bradshaw wrote “The idea of the Sanjay Mortimer Foundation (SMF) was born almost as soon as we realised we’d lost him. It was the obvious way to keep his memory alive, support the industry he loved whilst also helping those who are faced with similar challenges to himself. Its mission is: ‘To help those with neurodivergent minds, recognise their strengths and talents, through engineering and making’. Having ADHD himself, Sanjay was acutely aware how challenging conventional education can be for divergent thinkers and how easy it is for them to slip through the net, simply because they do not fit the mould of traditional educational systems. The hope is to discover gifted young adults who would benefit from funding, and help them realise their potential through making.”
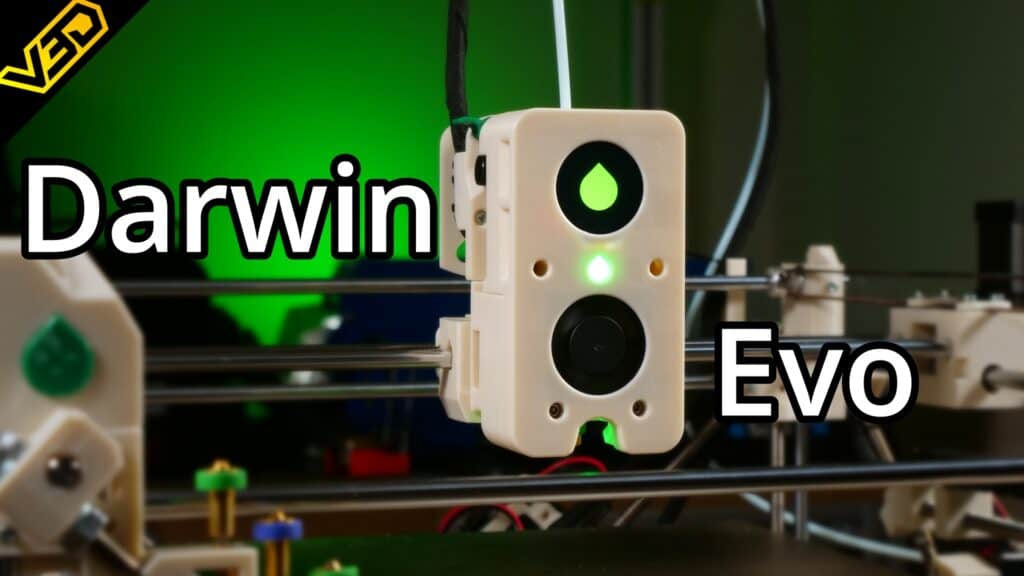
So how does this all relate to me designing and building Darwin Evo for SMRRF? Well, as a small 3D printing youtuber and company, based in the UK, and having had the pleasure of talking with Sanjay on a couple of occasions, I wanted to do something for the event that would hopefully be a highlight for those visiting and also raise some funds in the live auction. For a community more about giving than taking, it had to be open source. I also wanted the project to feel important and relevant in a world where every 3D printer claims increasingly insane speeds, and to have significance both for Sanjay’s work, as well as RepRap.
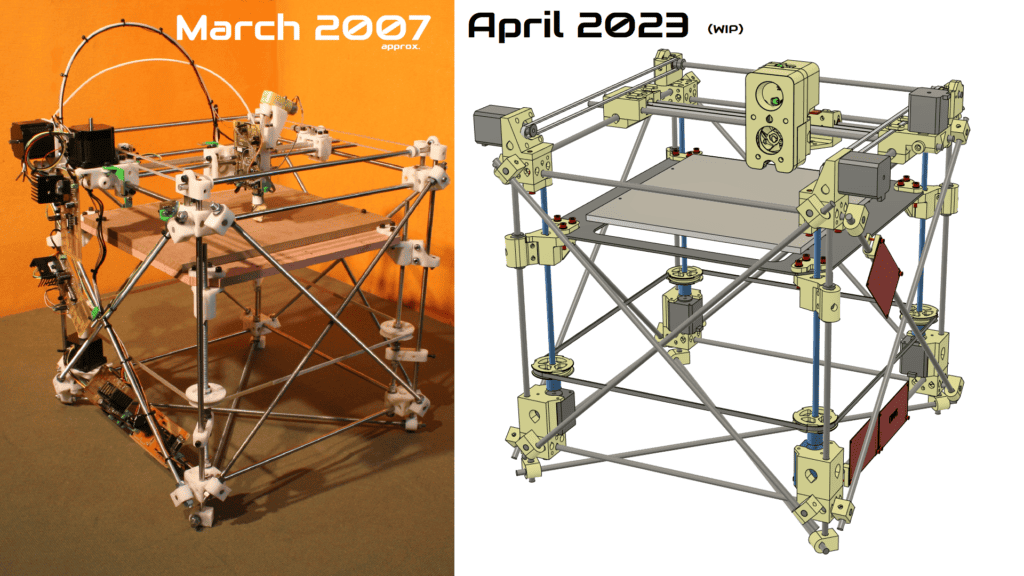
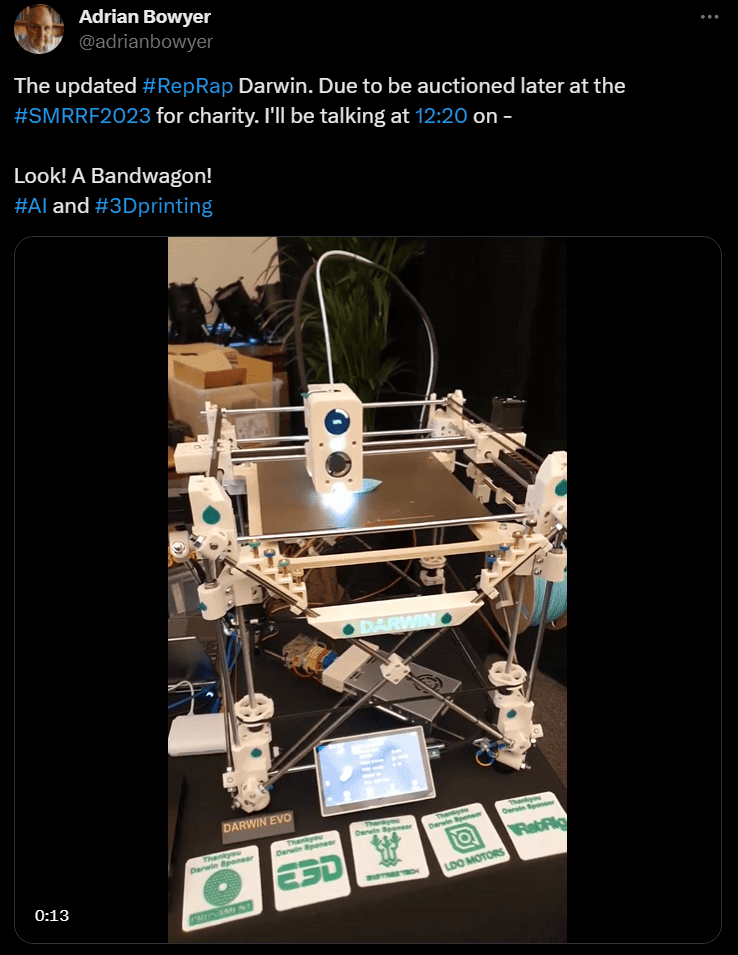
As you’ll probably have guessed by now, my conclusion was to build Darwin Evo. A 2023 version of the 2007 RepRap Darwin that started it all but with a nod to all the developments in 3D printing since that date; utilising inspiration from open source designs and integrating the latest electronics. My concept was what the automotive and computer modifications industries call a sleeper build, it looks like a slouch on the outside, but when you look closer you realise its a modern design wrapped in an old exterior. In order to be significant in a world of “FASTER is BETTER”, I want Darwin Evo to be a refreshing experience where it’s not about speed, it’s about fun. Darwin Evo had to be a fun build, allowing learning along the way, and culminating in a 3D printer that works. It might not be the best, but it’s yours to do with as you wish. Design, develop, modify, improve and above all, enjoy!
The Kickoff
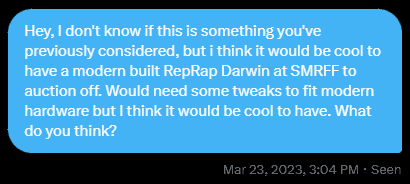
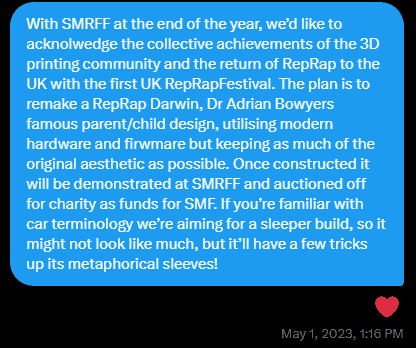
While I can’t precisely recall exactly when I first had the idea to build a Darwin for SMRRF, I can find the first time I talked about it, and that was to E3D with the following message via Twitter/X on the 23rd March 2023. To which E3D’s response was “We think it would be super cool!” and so that was pretty much that, it was decided. The build did not come without its challenges though.
The first step was to make sure I can do it without going out of business. Designing a new machine takes a lot of time, aka development cost, which I would have to put in myself as well as buying all the parts and building the machine. This was simply too much for my small company to handle alone. Thankfully over the years of doing Youtube I have talked with lots of great people and companies so I started to formulate a plan to understand what help I would need and from whom.
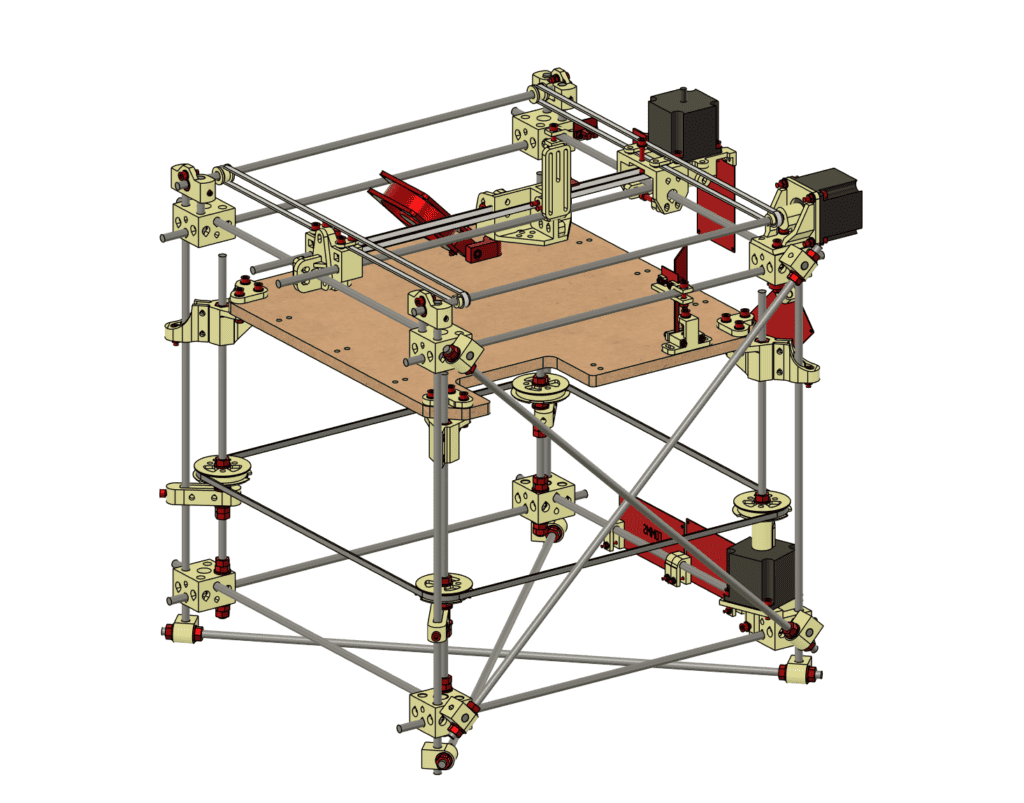
At the same time, I started on the Computer Aided Design (CAD) work. This essentially constitutes making the 3D printer in a 3D engineering software (Fusion360 in this case) to know what parts are needed, what the challenges are and creating the parts to be 3D printed. About 2 weeks after the initial twitter contactI had a concept of what the final build might look like and a list of things that I would need help with in order for the project to be a success.
As I have alluded to previously in other things I’ve written and discussed, I find it quite difficult to ask for help, even if it’s very willing to be given, this includes sponsors for work. I had to come up with a short pitch that would explain the project which I could email to potential sponsors asking for help. I shared it with E3D since they suggested it, and this is that message.
Together with a Bill of Materials (BOM) aka a list of materials required to build something, I sent off an email to a number of sponsors I thought might help. Fortunately they required very little persuasion, were on board from the start, and ready to provide anything that was needed for the project. In addition to the parts I also requested some funds to help with the development cost (time and parts) and I have to show respect to BigTreeTech especially, but also LDO Motors, as they both contributed funds to help. This put my mind at ease enormously and made me feel I was in a position to succeed. A big thankyou to the sponsors since without their support, this definitely wouldn’t have been possible: BigTreeTech, LDO Motors, E3D, RatRig, and Prusament.
While all of this was going on, I got increasingly anxious about another thing that plagues my mind often on larger projects. What if somebody else is doing the same thing? If someone else was going to make another Darwin for SMRRF, E3D would have known and told me, but I did wonder if others might be making one as YouTube content. What if theirs was so good and mine then looked like a copycat of their idea, or mine just became an insignificant spec in comparison? It would make all the effort and project redundant and wouldn’t have the significance to be good for the SMF auction. Despite these fears I carried on.
The Design Phase
Once I had commitment from the sponsors it was time to really plough some more time into, not just having a concept that looks cool, but actually design the detail of the machine so that it was actually possible to build and assemble. A lot of time consuming work.
If you’re not familiar with 3D CAD tools this bit might not make much sense but i’ll do my best to struggle through an explanation anyway. Because of the software conversion etc that needed to happen for me to work with the original Darwin 3D designs I did not have a feature tree, this is a list of detailed operations that make up the part. Instead I just have a ‘dumb solid’ which means its in the right shape, but no longer parametric.
In design there are two general methods for creation. Starting from nothing or modifying existing designs. Starting from scratch is slower to begin with, but allows for faster modifications when things get complex, while modifications allow you to start with a lot of the design already done, but once modifications pile up it’s slow to make changes and complex to understand what’s going on.
For the concept I started with the old CAD files and used modification tools to quickly and easily make a concept for what I wanted the final design to look like, but all those modifications took their toll on speed and making changes became very slow while I still had a lot to do. So I had to bite the bullet, as it were, and start the whole thing from scratch. Every component, every detail, every dimension, every shape, restarted from nothing. It takes a while, but would eventually allow me to work faster and neater.
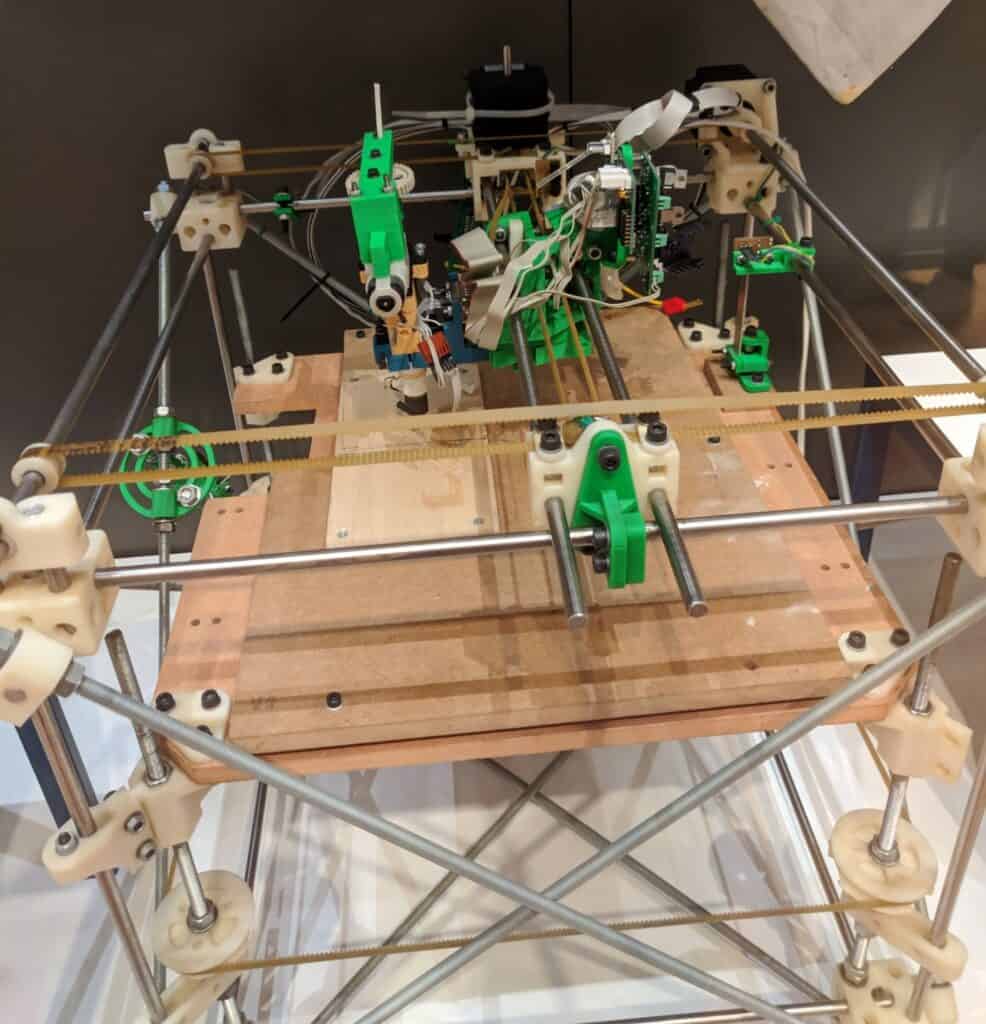
When creating the design details, I knew it was important to get some reference images for what the final design should look like. Since I had never seen a Darwin 3D Printer before, and couldn’t exactly ask around without losing the project secrecy, on the 15th of July I took a little trip to London Science museum where the Original Darwin is Situated. A very valuable trip where I could take pictures and get a sense for how the machine looked, beyond what I could gather from the digital files and other internet sources.
By the 25th of July, things were looking great. I’d had confirmation from most of the sponsors that the parts they agreed to send were on their way and some had already arrived. The initial concept was looking promising and I had started the CAD recreation from scratch. Unfortunately that good progress was short lived as just a few days later, the 30th June 2023, I was diagnosed with bowel cancer which would require surgery. I’ve written about this experience quite extensively on the just giving page that I created during my recovery from this so I won’t go into details now.
Suffice to say, that this was a severe hit for not just this project, but for my business, my personal life, and every project I had running. Everything I had in progress was cancelled with no expected date to restart. Surgery was on the 10th August and despite the expected visit of 3-5 days, it ended up being 3 weeks. Once out of hospital is when recovery started and that was at least an 8-12 week process before I felt like anything that could be described as normal.
Skipping past those details, that took a few months of time from the project. It got to the second week in October, a mere 7-8ish weeks until SMRRF and I had no printer, no completed CAD, and very little physical energy. Being in a weakened state also meant my normal strategy of just piling loads of hours wouldn’t work, at least not if I wanted to stay out of hospital.
Slow and steady wins the race, at least that’s what the tortoise says. That had to be my ethos here, start with the CAD while my energy levels are low, make sure all the parts are getting delivered and then when physical capabilities are better and I have the strength to lift basic objects, I can start the build.
The CAD
In my mind using CAD as a tool is a bit like the phrase, “measure twice, cut once”. The more detail you can put into your model to resemble reality, the more you can iron out issues in a digital space, the more time and money you can save on hardware and printing. So that was the goal, a complete construction of the machine in fusion360 CAD, in a way that allowed me to build the machine digitally.
Trying to explain my thought process to you regarding CAD work feels akin to translating instructions through multiple languages. You hope to get the gist of the message, but any nuance is often lost. Nevertheless, I’ll do my best to walk you through the design, what I did, and why I did it.
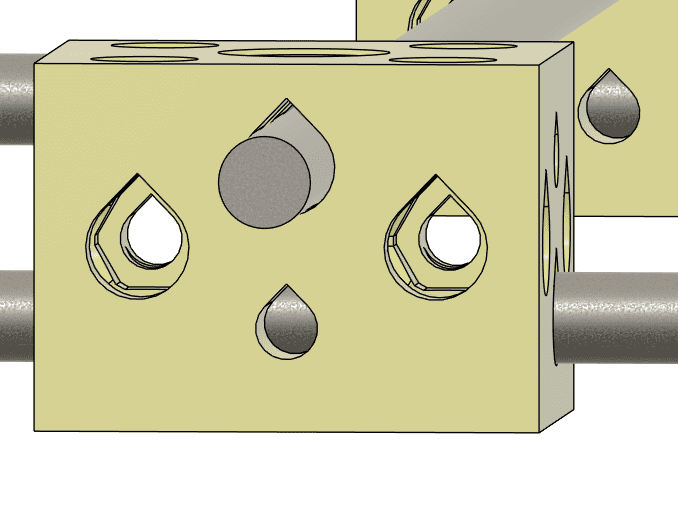
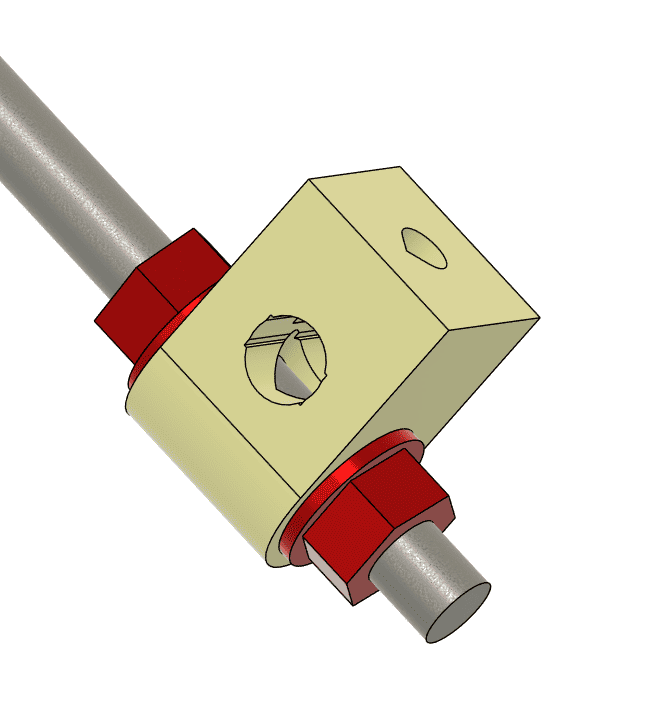
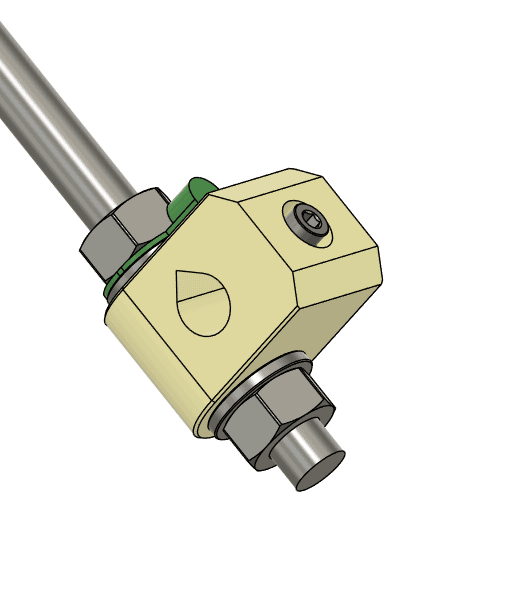
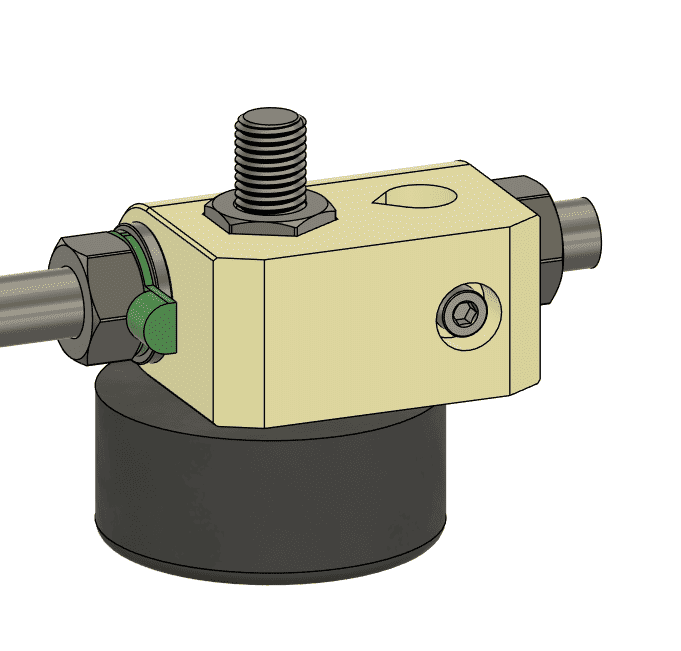
The corner blocks are literally and figuratively the cornerstone of the build and are quite an iconic part of the machine which is very recognizable at a distance so I need to ensure visual changes were minimal.
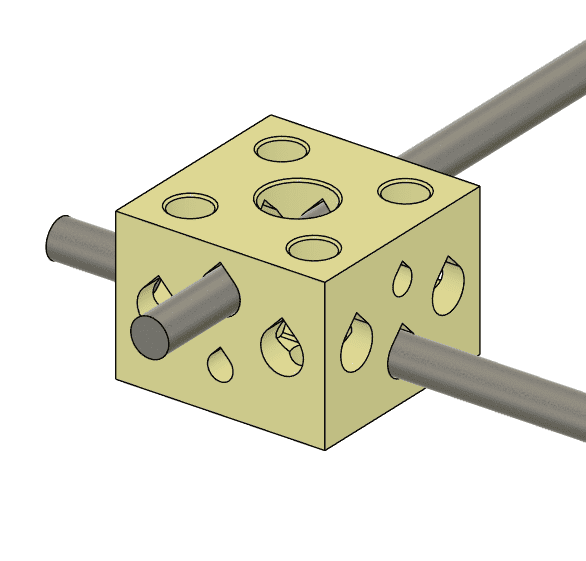
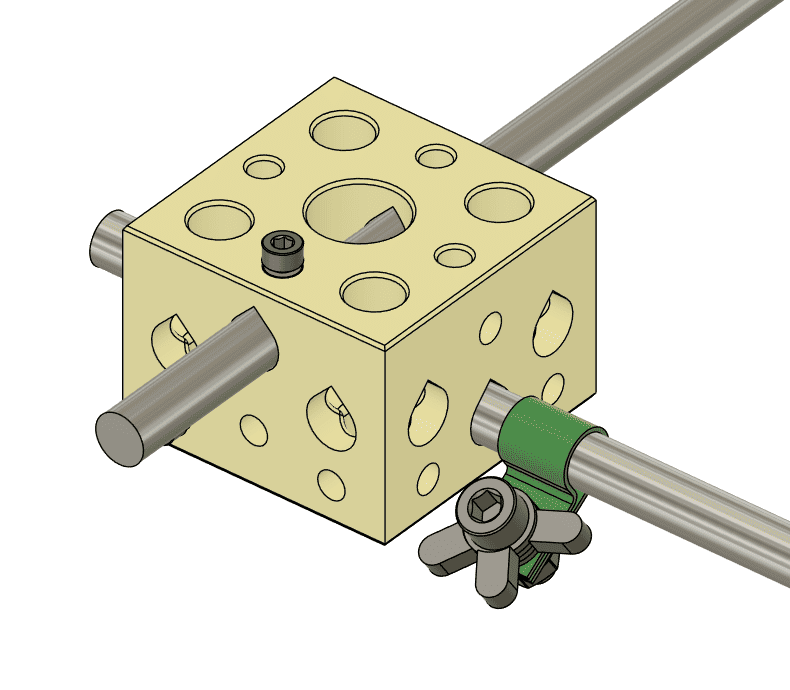
In the original there are some internal nut spaces but from the CAD and my museum pictures I couldn’t really determine what they were for, perhaps something that was never used in the end. It also wasn’t very clear how these were held together. I don’t think they were a friction fit since the holes are too large, so maybe they are just held by the cross braces. In my design I decided to use heat set inserts and M3 screws as grub screws. This allows the rods to slide into place really easily and also be secured in place simply with a screw. It does require the parts to be quite strong, but I didn’t experience any significant issues.
It’s at this point that you might notice the teardrop shapes for the smooth rod holes, yes those were part of the original design, so I can only presume it is the source of the RepRap teardrop logo.
Source: RepRap.org/wiki
Next we move on to the cross braces. These are the core of the strength in this design. The rods and nuts are all original size, but I’ve made adjustments to the 3D printed parts at each end. These used to require an M5 nut to be pushed in through the 8mm hole, but this didn’t seem like fun to do so many times, so again I’ve utilised heat set inserts and M3 Screws to make something a little easier to assemble. I also added more teardrops, because I could.
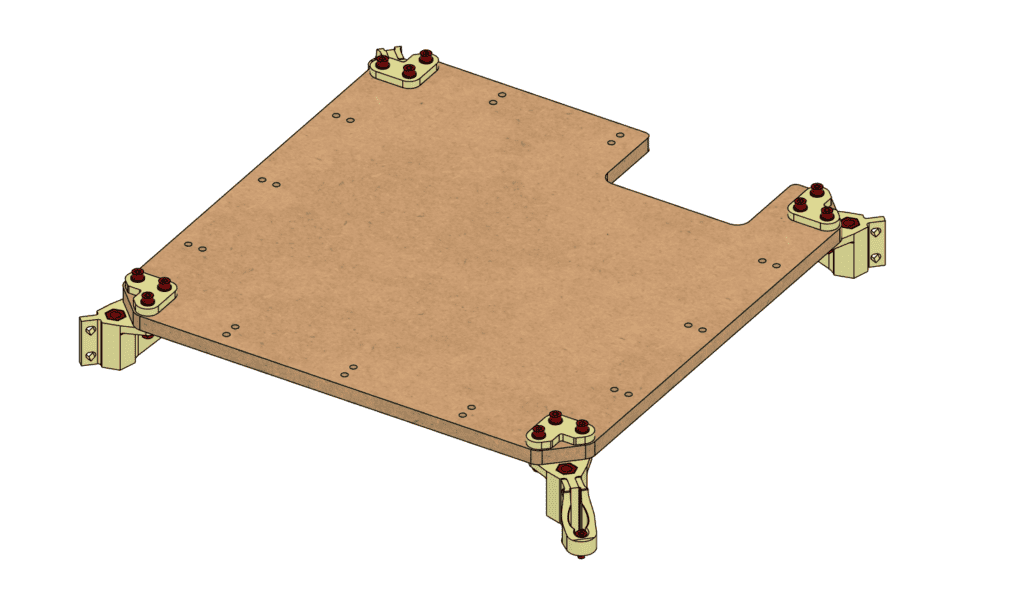
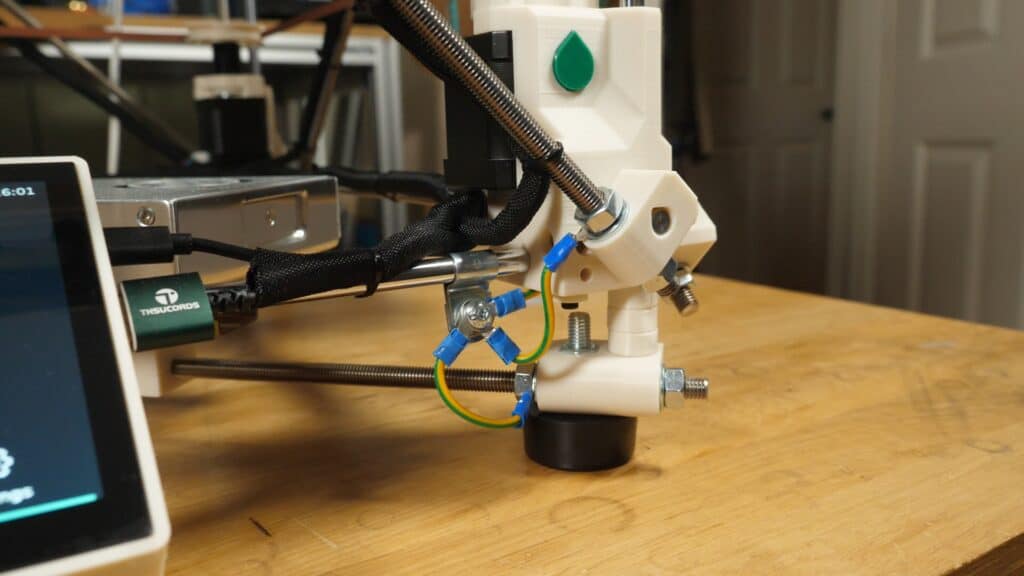
For the joints at the base of the Z that form the XY Cross Brace, I extended the length of the block to allow for fitting of the feet that are used in the Voron Trident. The original design had no feet at all but for the sake of not destroying my desk or anything else the printer touched, I decided feet would be a good idea.
Next we move on to the Z axis motion system. In the original this consisted of a single NEMA23 facing downwards with a 3D printed coupler joining it to a M8 threaded rod and 4 printed pulleys joining them together. The M8 screws were used where today you’d typically see lead screws. The arms below the large pulleys hook over the M8 smooth rods of the main frame and are used to prevent the tension of the belt pulling the z screws inwards.
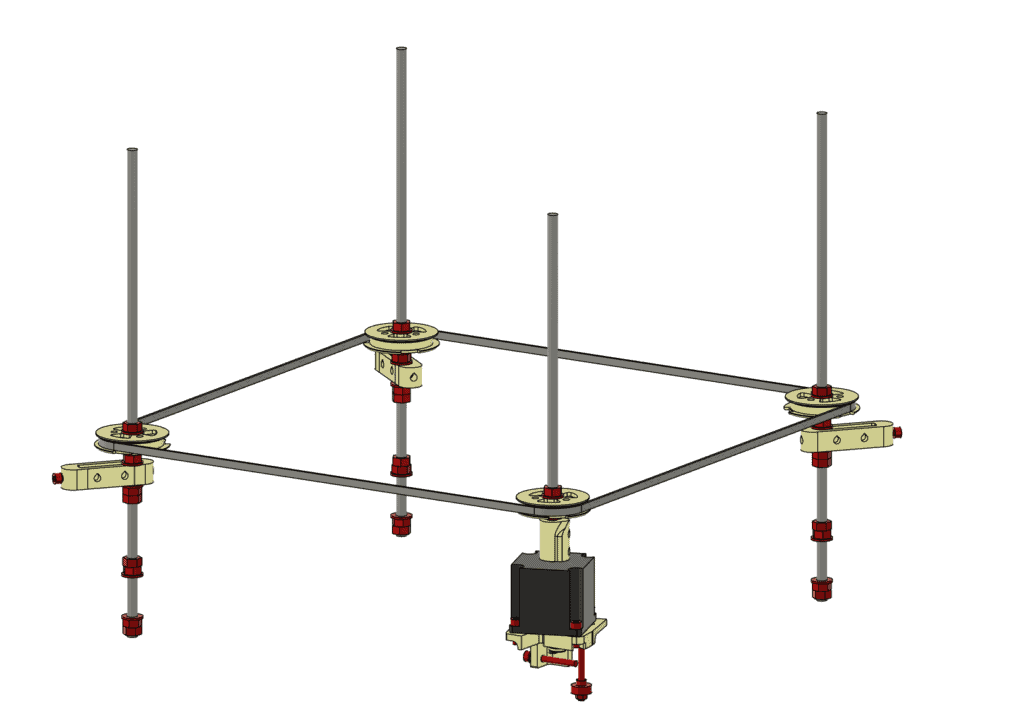
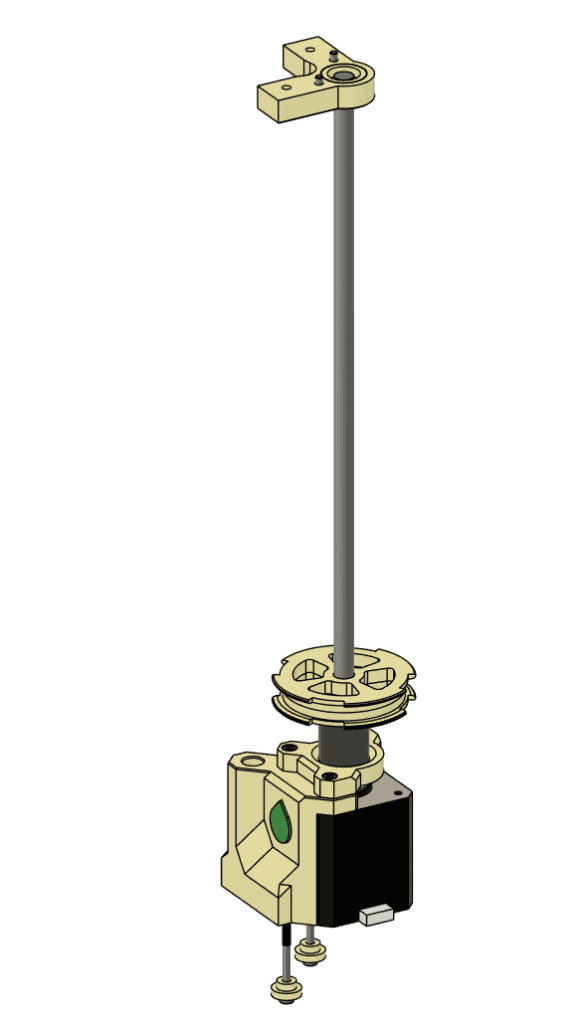
In Darwin Evo there are four identical assemblies which make up the Z system. Each of these assemblies are based on the RatRig V-core 3.1 design. I used the same thrust bearings, lead screws, lead screw coupler, Oldham decoupler, and top bearing. The large pulleys make a reappearance here even though the motors are all independently driven, but it’s just a loose fit and has no effect, it’s just for the looks! The motor cage and top bearing mount to their respective corner blocks using heat set inserts. One small aesthetic flourish on this assembly was the addition of the RepRap logo. I wanted the iconic teardrop shape to accent the build and so it found its place here and on a few other components.
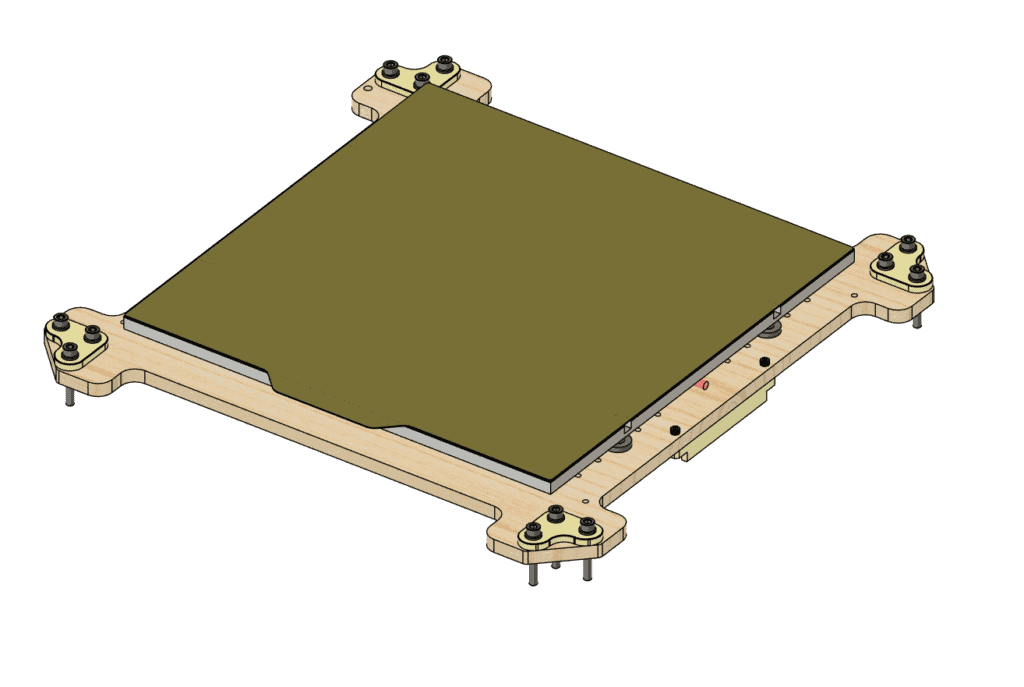
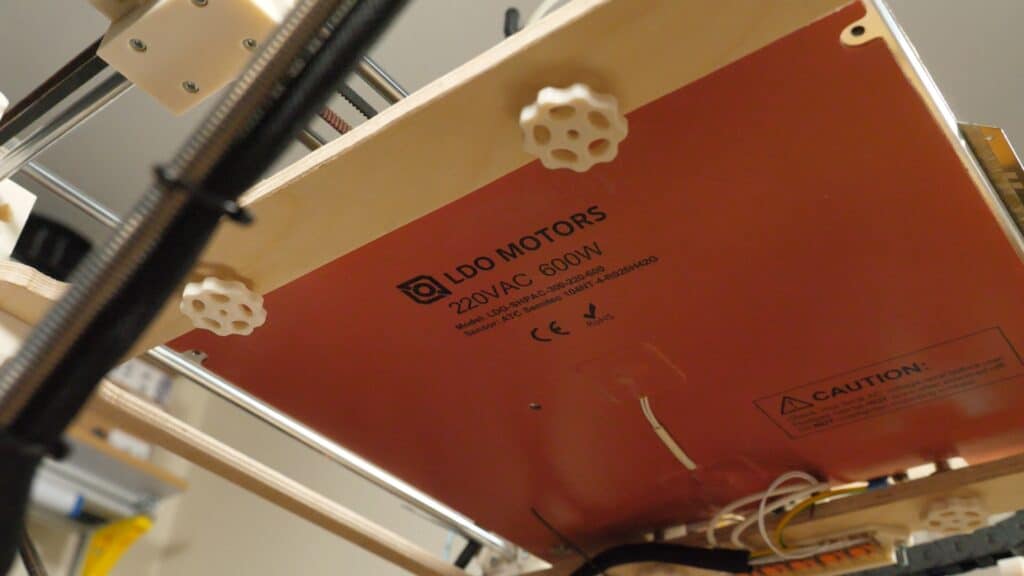
Next we move on to the bed. The original was just a single piece of MDF. I can’t imagine how difficult it must have been to get consistent adhesion with that. Apparently masking tape and paper were sometimes used as an alternative surface, but I’m not sure how much improvement that would be. Obviously there is no heating either. I made big changes here because I wanted to give this printer the chance at being reliable, so I’ve used a more common and recent bed arrangement. A mains powered 600W heater secured to 6mm aluminium bed, with a magnetic sheet and spring steel PEI print surface. If you recognise those specifications its because its a Voron v2.4 300mm bed from LDO.
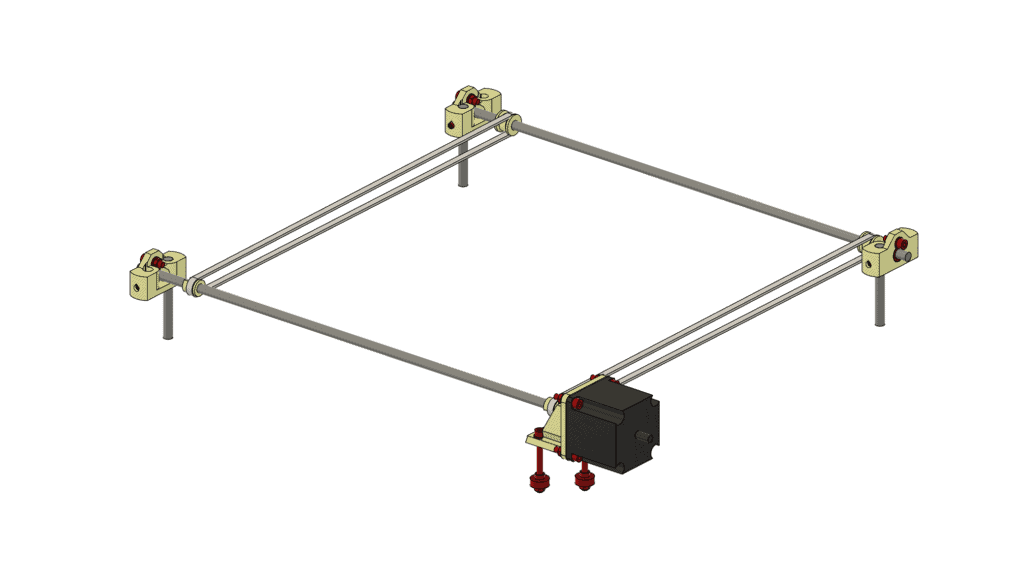
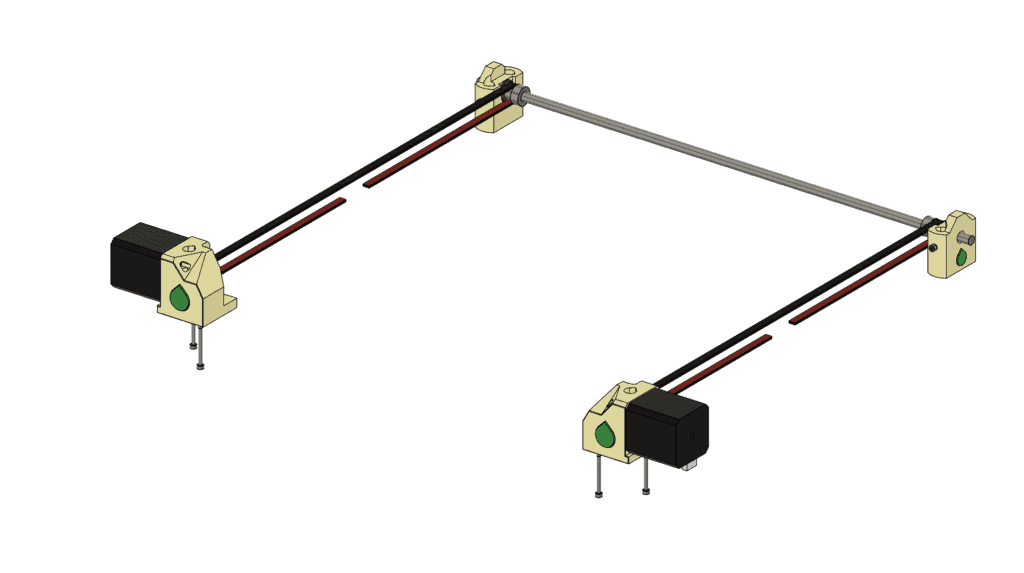
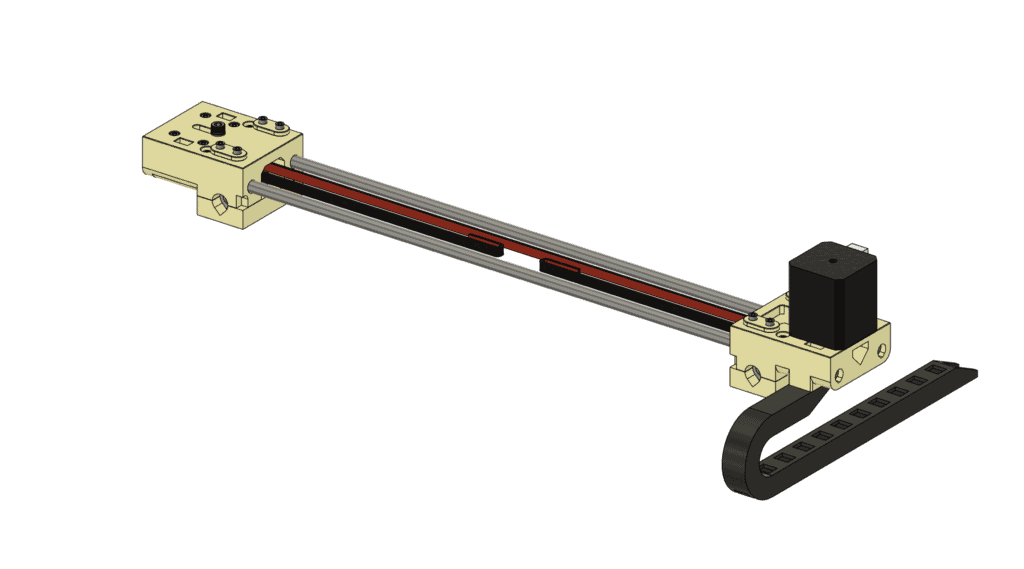
Next in the assembly process comes the Y Motor assembly. As with all other motors in the original Darwin, the Y axis used a NEMA23 motor which I decided to switch out for a pair of NEMA17 instead. In doing this I also removed the front rod that connected the two belts, but left the one at the rear of the printer. The belts are upgrade to modern Gates 2GT belts and the pulleys are no longer 3D printer since they are now commonly available hardware.
When it comes to the X gantry, one problem I could foresee was getting any decent belt tension during assembly. While the Y axis also had no tensioner, there was at least space to pull the belt tight by hand. The X idler end in its original design also restricted some of the available printing space. I made the decision to make the X idler end more similar to the motor end since this was better designed in my opinion. Making that choice not only gave me space to integrate a tensioner system, but would allow me to do so without impacting the available printing space. The bearings used on the original Darwin were not clear, but in my design of the gantry I have used LM8LUU bearings. When well made and well aligned, these bearings can run for a long time.

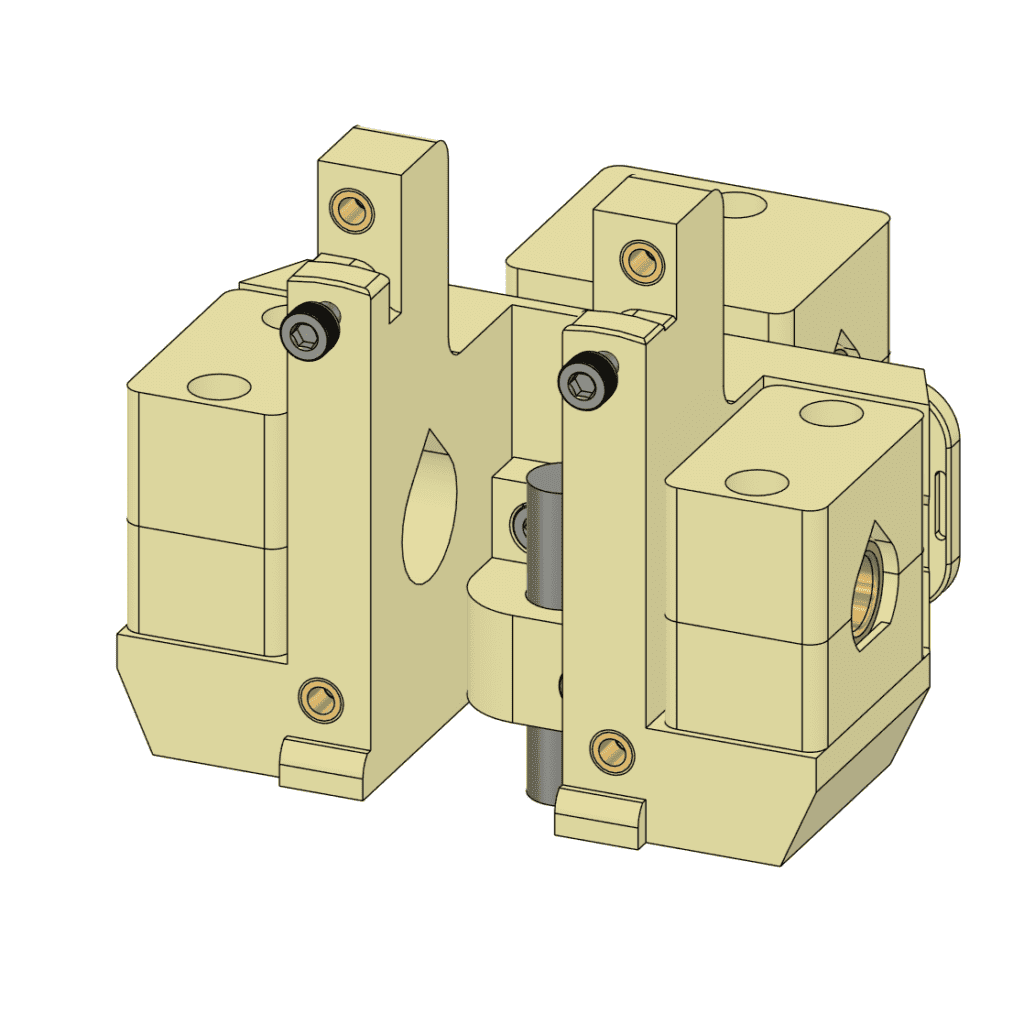
The X carriage, which runs along the gantry, is probably the most heavily modified part of the original system, along with the toolhead. One fundamental part of good print quality is the hotend, extrusion and cooling systems and these were things I did not have the time or inclination to design entirely from scratch. As a result, I needed to design a carriage that could receive an existing, albeit modified, design and in doing that it required significant modification away from the original, but I think it still looks suitably RepRap.
One of the challenges on the carriage was alignment of the bushings. I chose to use graphite brass composite bushings since these are used in some modern machines and I think they’re cool. The trouble with these is that they need to be very well aligned otherwise they tend to bind up causing a lot of friction. With all the carriage being 3D printed, it has a tiny amount of warp, it’s not visible but was enough to cause issues. The solution I came up with to ensure the bearings are well aligned is three bearing cages which can rotate independently and are only tightened once in place. This ensures that they can rotate to the point that causes the least friction for perfect alignment. In addition, the tilt of the bearings was also adjusted very finely with small bits of kapton tape. These two things were enough to get the very low friction movement I was after.
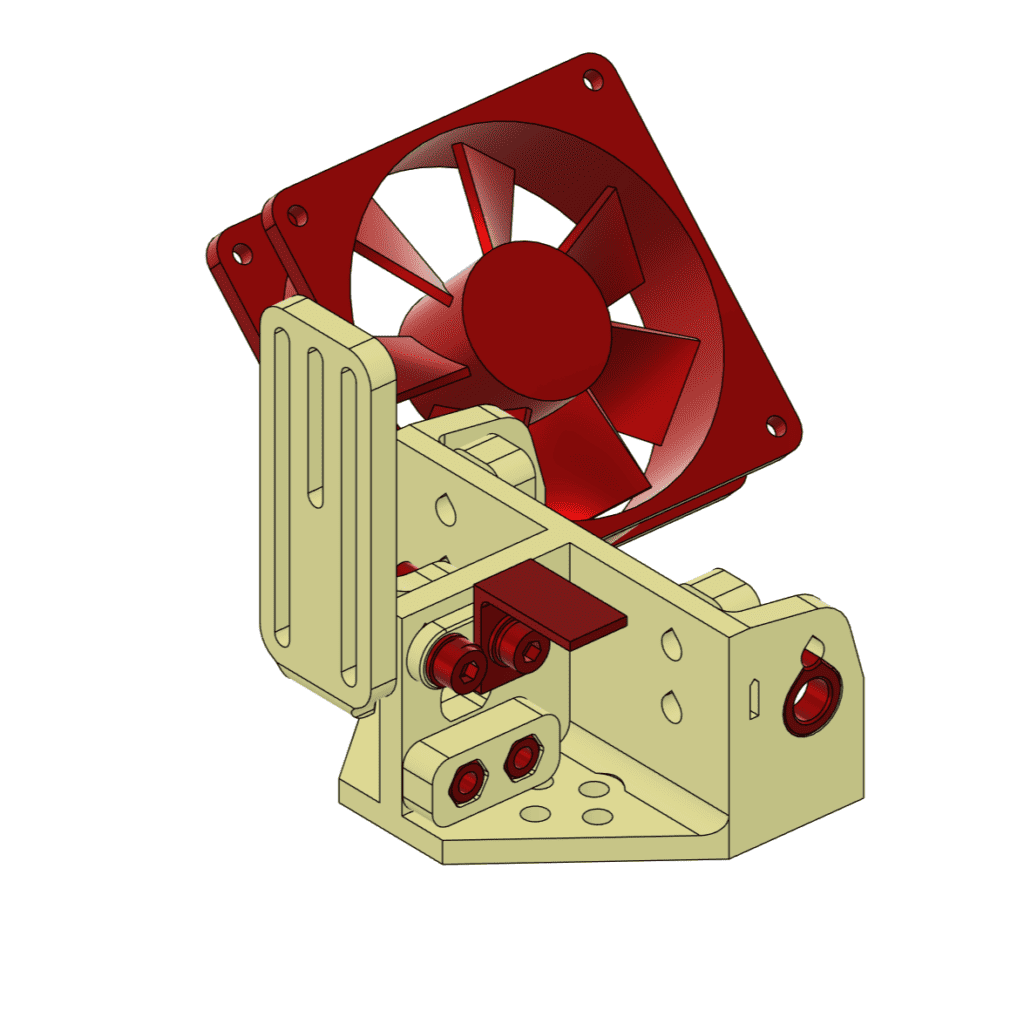
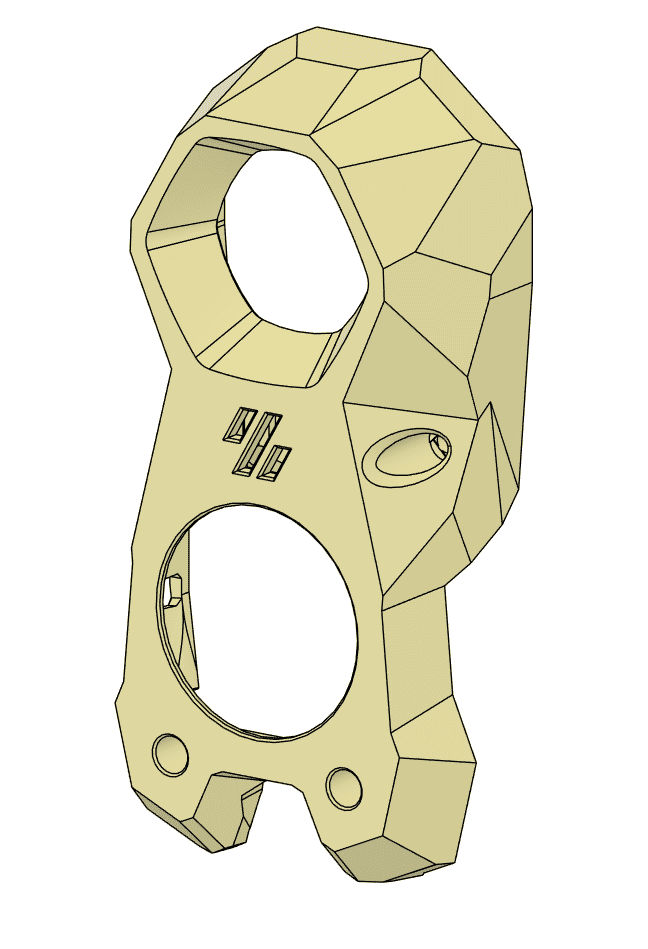
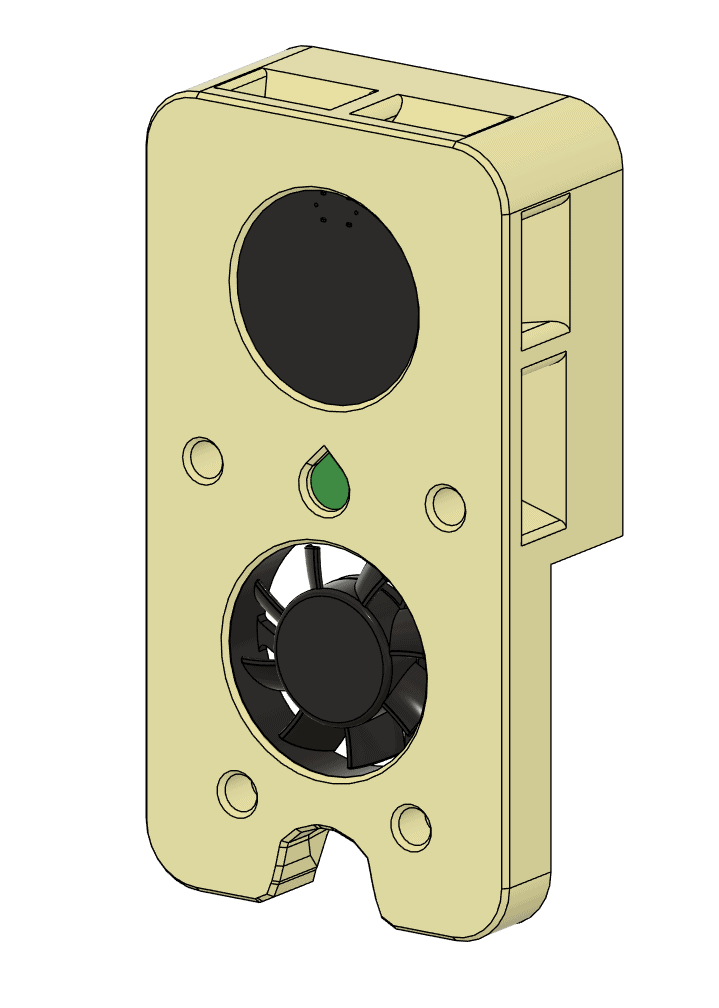
As I mentioned, the toolhead design is key to good print quality, so I went with a design which I knew would work as its already well tested; the voron design Stealthburner and Clockwork2. Clockwork 2 refers to the second iteration of extruder design for the toolhead, while stealthburner refers to the hotend and cooling design. The problem here was that it has a very distinctive and modern, low poly appearance which was way too cool for my RepRap. What I did was download the CAD files for these designs and turn them into big blocks with rounded corners to remove all that aggressive styling, but keep all the internal design on which the performance is determined. In addition to the styling modifications I also switched out the Voron design logo on the front for the RepRap one.
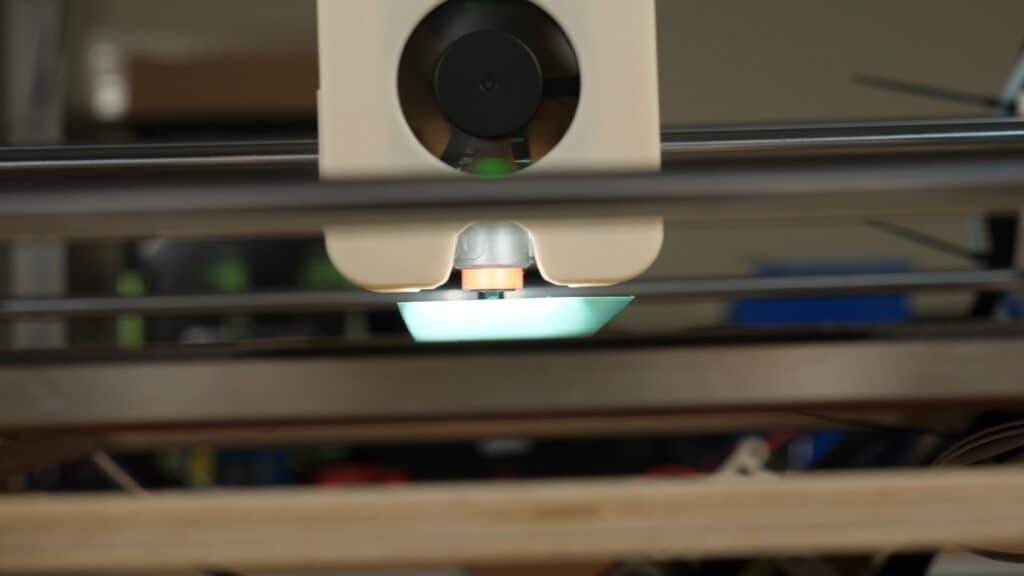
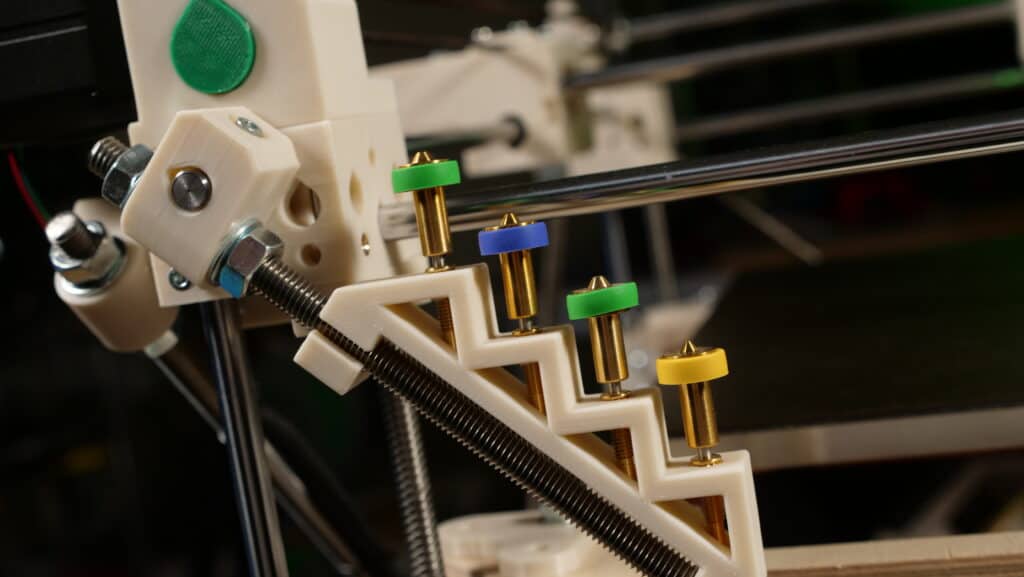
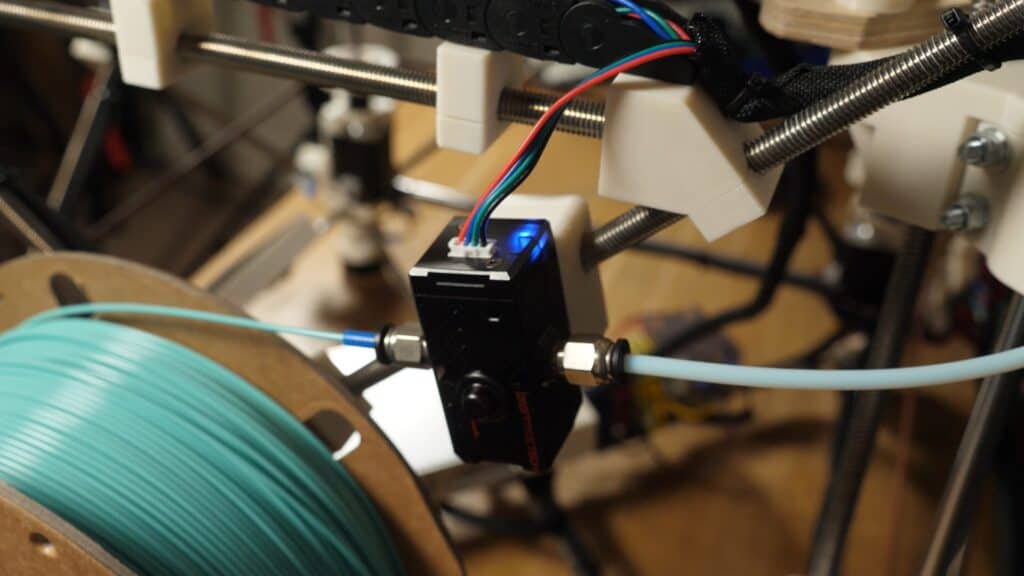
Of course, inside the 3D printed outer shell is in the important parts. The hot end I chose is, of course, the E3D Revo Voron with 60W heater and 0.4mm ObXidian nozzle. There is also a nice nozzle rack on the frame for storing a huge selection of extra nozzles.
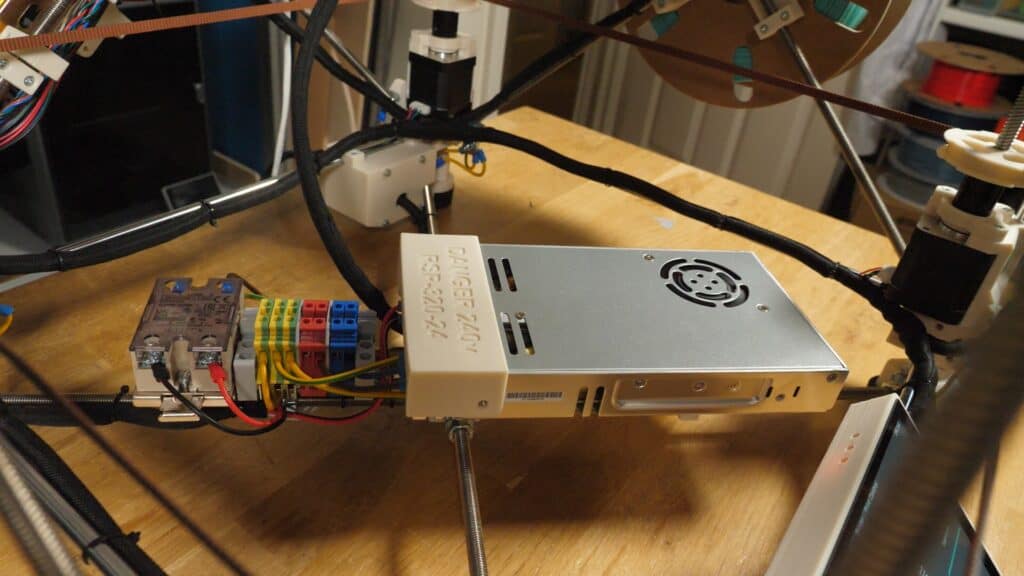
For the electronics, I chose to mount most of it using DIN rails. This was a principle that Voron Design introduced to 3D printing although it obviously existed extensively before this. The strength in this was the ability to shuffle things around or adapt the design, use different components etc. The only trouble with DIN rail on this machine is that there are no flat panels and mounting to rods allows rotation. I sorted this problem by using the central blocks on the cross beams, and it works really well.
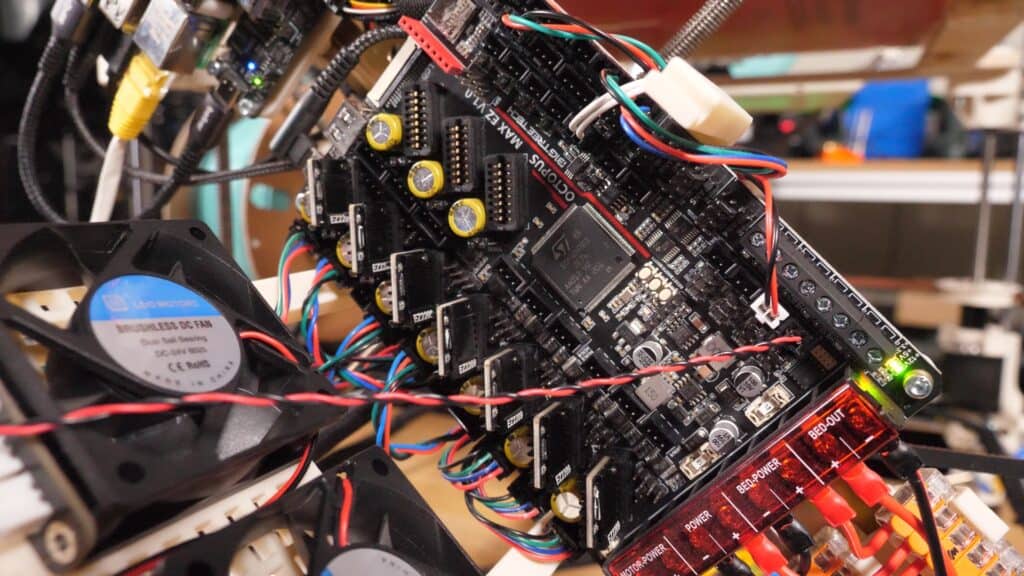
The main control board is the BigTreeTech Octopus Max EZ which is a monster of a control board which can take up to ten of the EZ format stepper drivers, of which I’ve populated seven, and a number of these can have sensorless homing enabled, which I’ve done here for the X and Y axis.
For powering the printer I’ve used an RSP-320-24, a 320W 24V power supply which is UK and EU compliant unlike the LRS series. The power is distributed via some DIN Rail terminal blocks for the high voltage and WAGO blocks for the low voltage. The bed is powered directly from the mains voltage, controlled by an SSR via the main control board. Switching the bed between 110V and 230V should be the only change needed for UK vs US electrical systems.
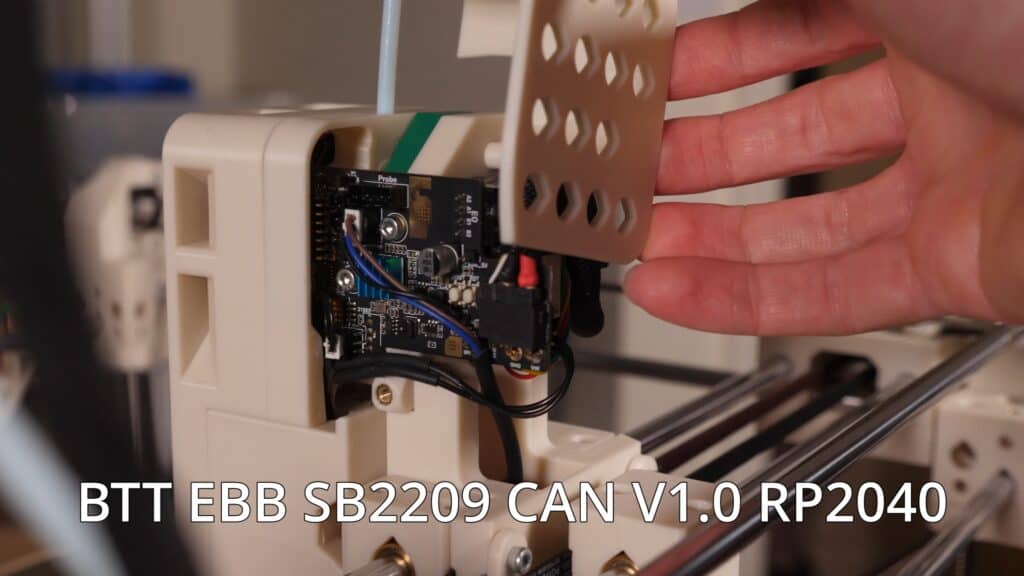
On the toolhead I have integrated a BigTreeTech EBB SB2209 CAN V1.0(RP2040) which uses CAN bus to communicate with with control board via the U2C and single board computer. It has a TMC 2209 driver for controlling the extruder stepper motor and uses and RP2040 as it’s MCU.
The whole system is running klipper, so of course it needs a single board computer to operate so the Raspberry Pi 4 was the obvious choice here. This is powered via ElectriPi, a prototype Vector 3D product which is essentially a buck converter for 12 or 24V to 5V with a maximum 5A current, 5V auxiliary output and fan for cooling but also integrates power protection circuitry for the pi which is normally not available when powering through GPIO.

At the front of the printer we have the HDMI7 which is an HDMI touch screen and this shows the Klipper screen interface. Personally I don’t find I use touchscreen interfaces very often as I often just use the web interface on my Klipper printers, but this screen really is very high quality and very easy to setup as it just plugs into USB and HDMI of the Pi. Seaking of the web interface, I’m running mainsail but I have made some little modifications to the UI to have the RepRap Logo and printer name in the top corner and colouring to a green theme. Just a little touch, but I really like it and just reminds you that this is no standard printer.

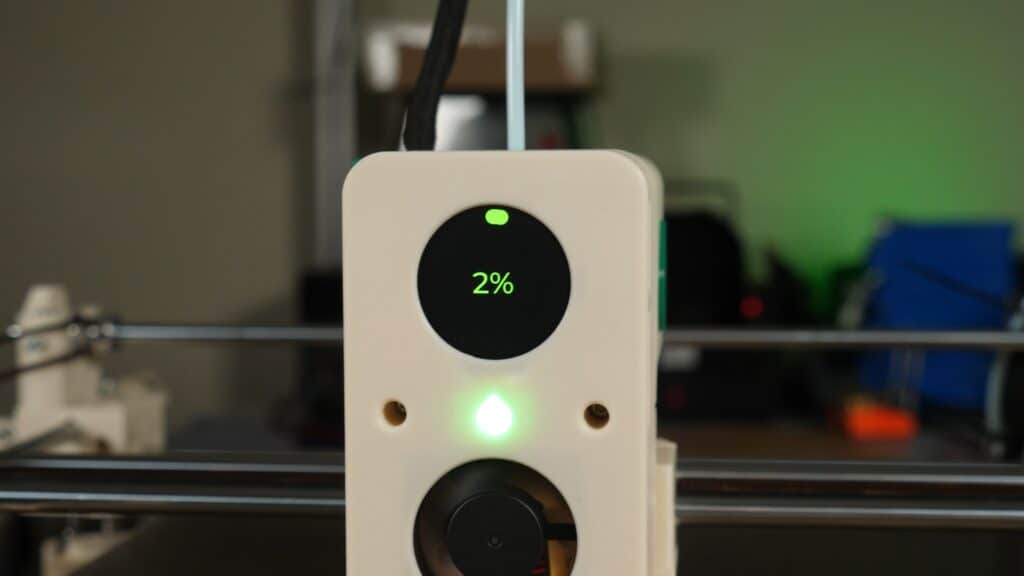
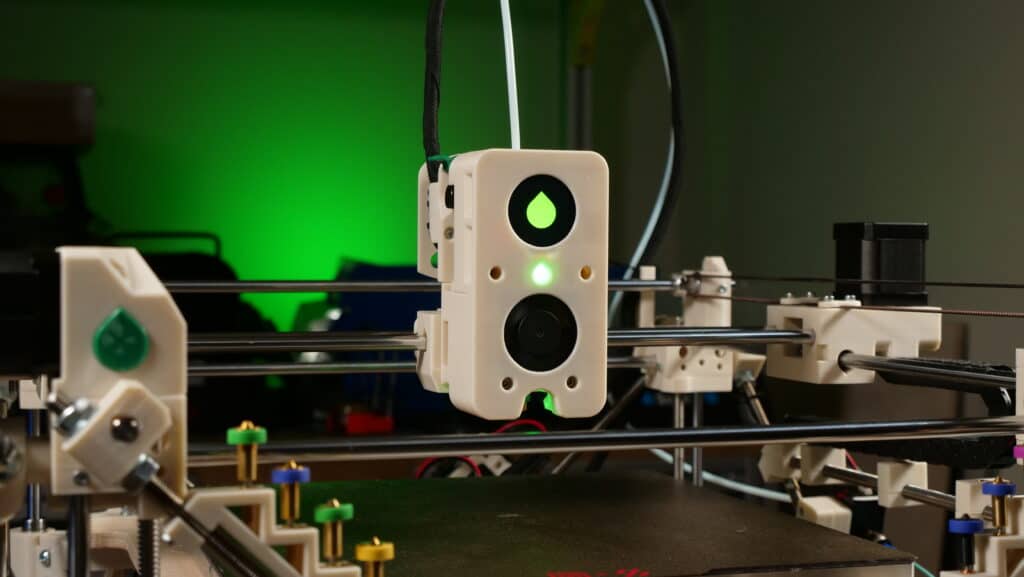
One item which took more effort to integrate was the Knomi screen. This is a small screen designed specifically for the Voron Stealthburner which sits in front of the top fan and displays various information including temperatures, print progress, logos and an expressive face. This uses wifi to connect to Klipper so the PI’s wifi is utilised to get a direct connection without the need for an external network. In addition, I have modified the Knomi firmware to change everything to a green theme to match RepRap and swapped the Voron logo animation for the RepRap one. Quite a time consuming process to do all this, but I think the final outcome looks really neat.
The last Bigtreetech item is the smart filament sensor. This is the V2.0 which has a couple of little improvements over the previous version. This can now separately react to filament jam vs filament runout, allowing you to trigger different gcode for each instance. It’s really simple to setup though and works really well.
That concludes the main design features and decisions on the Darwin Evo.
All that’s left is to build it. How hard can it be?
The Build
There is a concept in engineering design called Design for Manufacture (DFM) where you design in a way that is efficient and cost effective to manufacture. An example of DFM for 3D printing is controlling overhang angles to print without support. There is a lesser known cousin to this term and that’s DFA. Design for assembly, as you can probably guess, is about designing in a way that makes assembly efficient and simple. For a printer with many parts, Darwin Evo was surprisingly simple to assemble.
There is one exception to this and that is the corner blocks and starting frame. The corner blocks all look very similar, but need heat set inserts in slightly different places so It’s important to arrange these parts out, mark where the front is, and work from that. Once you have the orientation marked you won’t get lost each time you rotate the frame.
One question asked of me often at SMRRF was how I assembled it square and while it’s probably not perfect, I’d consider it quite easy to get square. When assembling the frame, I just measured the diagonals and locked things in place with the grub screws. In many other places i’ve used spacers to make sure things go in exactly the right position. The diagonal cross braces go on loose and just tighten into position and that holds everything together. If you need to make any adjustments you can just loosen the grub screws, give it a little nudge, and tighten back into place. I might be over trivialising it a little, but it wasn’t as difficult as you might think.
The longest part of the build was probably doing the wiring. For me, even if it makes no electrical difference, it’s important to make the wiring tidy. Not only does this make the build look more professional and finished, but it also makes things easier to diagnose and fix in a couple of years when you need to fix something but forgot how it all went together. The way I managed it was to put all the wiring in using the full length cables that everything came with, this made a huge mess that was difficult to follow, but with quite a lot of grit and determination I was able to gather them into routes that would make sense, bundle them together into the PET sleeving, and then cut and re-crimp the ends to just the right length. The exception here being the USB and HDMI cables which has to be just the right length to go to where they needed. Luckily 1m wire worked out just right.

In terms of the project timeline, building took a few weeks as there were some parts that had to undergo a little design improvement as I went along. I finished the build with just a few days to spare. I used the rest of this available time to arrange how I was going to take my entire shop stock to the event to run my shop from there for 2 days. I have to say, this is not likely to be something I do again. I’ll 100% be going to SMRRF, and might even have a booth, but I won’t run the whole shop, it’s just too difficult to do.
The Event
Although I have been in 3D printing for quite a few years now, and attended quite a few exhibitions, I have never been able to attend a RepRap Festival, so I had no idea really what to expect. Obviously i’ve seen videos online, but that only gives quite a narrow view of the event and this would be the first time I ever exhibit at an event so that was another new thing I had to get used to.
Luckily, thanks to the three volunteer helps I had from my family, the whole thing went off without a hitch, well almost anyway. We had some troubles here and there when the application we were using to sell products suddenly decided the currency would be in Euros, but the value would be in USD, even though we wanted everything in British pounds. Nevertheless, we pulled through and hopefully helped out a number of people make purchases without having to deal with shipping costs so definitely worth it from that perspective.
Saturday, day one, was the end of the auction, a live event held by Joel Telling of 3D printing Nerd. I was really nervous about this because it had been such a huge effort to make it this far, If the auction was a flop it would all be for nothing. During the day the auction price steadily increased and I had people keep asking me what I thought it was worth, but I had no idea really so I gave out random numbers to most people that asked, sorry! When the lot came up on screen It was really tense.
I was invited up on stage by Joel to talk about the machine which I did my best to do but live audiences are not really my thing, I get super nervous! Fortunately, a couple more bids came in and it finished up at £2650 and went to no other than Ellie Weinstein, the creator of Cocoa Press! What a relief, not only had we raised a huge amount for the Sanjay Mortimer Foundation, but It would go to a wonderful, trusted maker so I knew Darwin Evo #001 would be in good hands. Congratulations Ellie, thanks for letting me keep it just a little longer to make a video, and I hope you enjoy your new-old RepRap!
What’s Next for Darwin Evo?
As I mentioned, I was able to talk to so many people at SMRRF this year, so many visitors that were interested and keen to learn more about Darwin and RepRap that I had almost lost my voice by lunchtime on day one.
Amongst those people I talked to were some that asked questions about kits, a question which has come up a little more after the event too. While I don’t want to make any big commitments on this too early I’m hoping to be able to get kits to people that would like them. While the project is open source and the BOM is available, buying all the right parts can be a project on its own, and something that many people don’t want to deal with. Some things are in motion to try and make this work, i’ll try my best to keep you updated.
There is one more exciting thing that I’d like to announce. I’m going to be building a Darwin Evo for Jo Prusa. Yes, that Jo Prusa, from Prusa Research. Jo asked me to do this, and I checked with Ellie since part of Darwin Evo was being a unique 1 of 1 machine. Ellie to go ahead so you can expect to see that build in 2024 along with a donation for Jo to match the £2650 from Ellie putting the Darwin Evo project total to a massive £5300 for SMF. I could not be more proud of our little 3D printing community, you’re all amazing.
In closing, sadly I was not fortunate enough to be that close to Sanjay, but I was lucky enough to have met with him on more than one occasion and his excitement for 3D printing and engineering was certainly infectious. I hope it’s fair for me to say, I think he’d be extremely proud of what SMRRF the SMF has achieved. Well done particularly to Teula and Georgia for all that you’ve done, you’re both incredible.
See you at SMRRF 2024 for more fun and fundraising!
Adam, Vector 3D

Links
- Info about kits: https://vector3d.co.uk/product/darwin-evo/
- Darwin Evo Open Source Data: https://www.printables.com/model/685181-darwin-evo-3d-printer
- More info about RepRap Darwin: https://reprap.org/wiki/RepRapOneDarwin
- BigTreeTech: https://biqu.equipment/
- LDO Motors: https://docs.ldomotors.com/en/voron/voron2
- E3D: https://e3d-online.com/
- RatRig: https://ratrig.com/
- Prusament: https://www.prusa3d.com/category/prusament/